
TONSILLECTOMY
Tonsillectomy: A Deep Dive into the Procedure
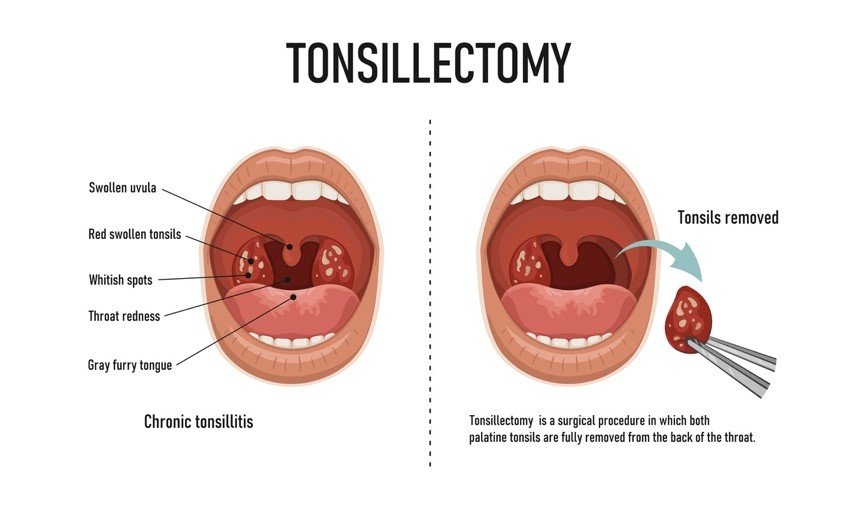
Tonsillectomy, the surgical removal of the tonsils, is a common procedure often performed on children but can also be advised for adults experiencing persistent problems. This detailed summary delves into its purpose, preparation, steps, benefits, risks, and recovery to comprehensively inform you.
Understanding the Why:
The tonsils are lymphoid tissues located at the back of the throat, contributing to the immune system. However, they can be problematic when:
- Frequent infections: Repeated tonsillitis (inflammation) with five or more episodes in a year, or three episodes each year for two years.
- Sleep-disordered breathing: Enlarged tonsils obstructing airways, leading to snoring, sleep apnoea, and daytime sleepiness.
- Other complications: Difficulty breathing, swallowing issues, or severe tonsillitis causing complications.
Preparing for the Big Day:
- Pre-operative evaluation: The doctor examines your throat, reviews your medical history, and discusses the procedure and anaesthesia options (usually general anaesthesia for children, local with sedation for adults).
- Blood tests: Routine blood tests may be required.
- Medications: Inform your doctor about any medications you take, especially blood thinners.
- Fasting: You may be instructed to fast for several hours before surgery.
The Surgical Journey:
- Anaesthesia: You’ll be comfortably asleep or numbed depending on the chosen anesthesia.
- Access: The surgeon uses specialized instruments to access the tonsils through the mouth.
- Removal: Different techniques exist, but commonly, the tonsils are removed using:
- Cold steel dissection: Removal with a scalpel.
- Bipolar diathermy: Electro-cautherisation device to minimize blood loss
- Coblation: Using radiofrequency energy to remove tissue.
- Bleeding control: Careful cauterisation to minimize bleeding.
- Closure: No external stitches are typically needed.
The Road to Recovery:
- Hospital stays: Depending on age and complexity, you might stay overnight or be discharged on the same day.
- Pain management: Medications will be provided to manage throat discomfort, typically peaking within 2-3 days.
- Sore throat and difficulty swallowing: Expect discomfort for 1-2 weeks, gradually improving.
- Earache: Referred pain from healing may occur in the ears.
- Diet: Start with soft foods and clear liquids, gradually progressing as healing allows.
- Activity restrictions: Avoid strenuous activities for a few weeks to promote healing.
- Follow-up appointments: Regular checkups are crucial to monitor healing and address any concerns.
The Rewards of Removal:
- Reduced infections: Significantly fewer or even no future tonsillitis episodes.
- Improved sleep: Relief from sleep apnea and better sleep quality.
- Easier breathing: Reduced obstruction and improved airflow.
- Overall improved quality of life: Reduced pain, discomfort, and potential social/emotional impacts associated with the above issues.
The Upsides of Fixing the Crooked:
- Improved breathing: The main benefit, often leading to significant relief from nasal congestion and difficulty breathing.
- Reduced facial pressure and pain: Eliminates pressure build-up and associated discomfort.
- Reduced snoring and sleep apnoea: Improved airflow can significantly reduce snoring and potentially resolve sleep apnoea.
- Decreased sinus issues: Better drainage reduces the risk of postnasal drip and recurrent infections.
- Overall improved quality of life: Breathing easier and sleeping better often leads to a significant improvement in well-being.
Potential Bumps on the Road:
- Bleeding: Minor bleeding after surgery is common but usually self-resolves.
- Infection: Though rare, proper hygiene and follow-up care minimize the risk.
- Dehydration: Difficulty swallowing may increase dehydration risk.
- Anaesthetic risks: As with any surgery, there are potential risks associated with anesthesia.
Remember:
- Tonsillectomy is a safe and effective procedure with high success rates when performed by a qualified surgeon.
- The decision to undergo surgery depends on individual factors, severity of concerns, and potential risks vs. benefits.
- Open communication with your doctor is crucial throughout the process.
Disclaimer: This information is intended for general knowledge only and does not constitute medical advice. Please consult with your healthcare professional for diagnosis and treatment planning based on your specific situation.
ADENOIDECTOMY
Adenoidectomy: Removing Adenoids for Improved Breathing and Health

An adenoidectomy is a surgical procedure designed to remove the adenoids, a small mass of lymphoid tissue located at the back of the nasal cavity, above the roof of the mouth. This tissue plays a role in the immune system, but when enlarged, it can cause a variety of problems.
Why Perform an Adenoidectomy?
There are several reasons why a doctor might recommend an adenoidectomy for a child:
- Chronic Enlarged Adenoids: When the adenoids become chronically enlarged, they can block the airway, leading to:
- Difficulty breathing, especially at night (sleep apnoea)
- Mouth breathing
- Frequent snoring
- Recurrent ear infections (otitis media) due to blocked Eustachian tubes
- Facial pressure or pain
- Sleep disturbances and daytime fatigue
- Frequent Upper Respiratory Infections: Enlarged adenoids may be more susceptible to infection, leading to frequent colds, sore throats, and sinus infections.
- Complications from Allergies: In children with allergies, enlarged adenoids can worsen symptoms like congestion and difficulty breathing.
Who is a Candidate for Adenoidectomy?
Adenoidectomy is typically recommended for children between the ages of 3 and 7 years old. This is because the adenoids naturally shrink in size and become less important in the immune system as children reach adolescence.
Types of Adenoidectomy:
There are two main ways an adenoidectomy can be performed:
- Traditional Adenoidectomy (Curettage): This is the older method, where the surgeon uses a curette, a spoon-shaped instrument, to scrape away the adenoid tissue.
- Suction Cautery or Microdebrider Adenoidectomy: These are more modern techniques that use suction and either cautery (heat) or a microdebrider (small, high-speed shaving instrument) to remove the adenoids. These methods are generally quicker and involve less bleeding.
The Adenoidectomy Procedure (Typically Outpatient Surgery):
The details of the procedure depend on the chosen technique, but here’s a general breakdown:
Pre-Operative Assessment:
- Medical History and Physical Examination: The doctor will review the child’s medical history, perform a physical examination focusing on the ears, nose, and throat, and discuss the procedure with the parents/guardians.
- Imaging Tests: X-rays or CT scans may be ordered in some cases to assess the size of the adenoids and surrounding structures.
- Anaesthesia: The procedure is typically performed under general anaesthesia for children.
Surgical Steps:
- Anaesthesia Induction: The child receives general anaesthesia to ensure they are comfortable and unconscious during the procedure.
- Instrument Insertion: The surgeon inserts an instrument through the mouth or nose to reach the adenoids.
- Adenoid Removal: Using the chosen technique (curette, suction cautery, or microdebrider), the surgeon removes the adenoid tissue.
- Bleeding Control: Any bleeding is controlled using cauterization or other methods.
- Closure: No stitches are typically needed.
Recovery from Adenoidectomy:
Recovery from an adenoidectomy is usually quick and involves:
- Hospital Stay: Adenoidectomy is often an outpatient procedure, allowing children to return home the same day.
- Discomfort: Children may experience mild sore throat for a few days after surgery. Pain medication can help manage discomfort.
- Dietary Restrictions: Soft foods and cool liquids may be recommended for a day or two after surgery.
- Activity Restrictions: Strenuous activity may be restricted for a short period to allow for healing.
- Follow-up Appointment: A follow-up appointment with the doctor is scheduled to monitor healing.
Benefits of Adenoidectomy:
Adenoidectomy offers several potential benefits for children experiencing problems due to enlarged adenoids:
- Improved Breathing: Removing the blockage allows for easier breathing through the nose, reducing symptoms like snoring and sleep apnoea.
- Reduced Frequency of Ear Infections: By improving Eustachian tube function, adenoidectomy can help prevent or reduce the frequency of ear infections.
- Improved Sleep Quality: Better breathing and fewer ear infections can lead to improved sleep quality for the child.
- Reduced Facial Pressure: Enlarged adenoids contribute to facial pressure and discomfort. Removing them can alleviate these symptoms.
- Fewer Upper Respiratory Infections: While the adenoids play a role in the immune system, their removal doesn’t significantly impact overall immunity.
Disclaimer: This information is intended for general knowledge only and does not constitute medical advice. Please consult with your healthcare professional for diagnosis and treatment planning based on your specific situation.
UVULO-PALATO-PHARYNGOPLASTY (UPPP)
UPPP: Unveiling the Procedure in High Detail
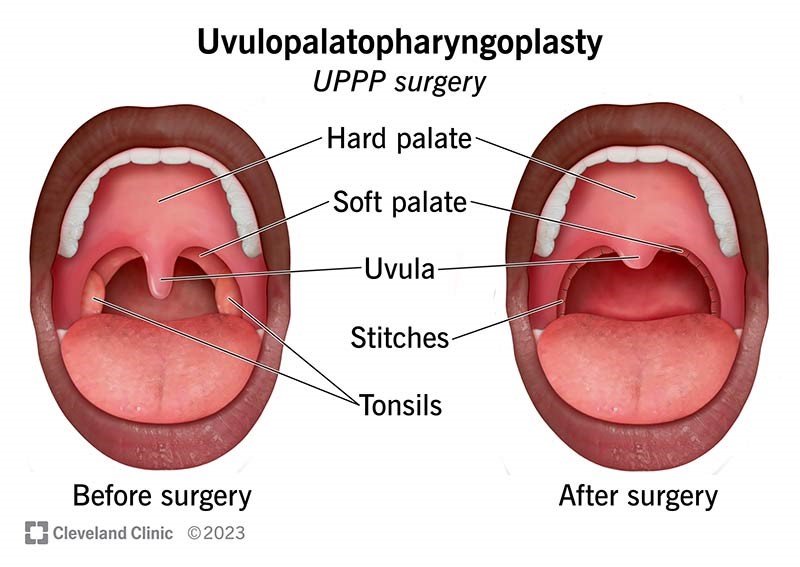
Uvulopalatopharyngoplasty, often shortened to UPPP, is a surgical procedure aiming to improve breathing by widening the airway at the back of the throat. This detailed summary delves into its purpose, preparation, steps, benefits, risks, and recovery to equip you with comprehensive knowledge.
Understanding the Need:
UPPP primarily targets Obstructive Sleep Apnoea (OSA), a condition where the airway repeatedly collapses during sleep, causing breathing pauses and sleep disturbances. These collapses often occur due to excess tissue in the throat, including:
- Uvula: The teardrop-shaped tissue hanging at the back of the throat.
- Soft palate: The fleshy roof of the mouth behind the hard palate.
- Tonsils: Two fleshy pads at the back of the throat.
Preparing for the Transformation:
- Pre-operative assessment: Your doctor will discuss your sleep history, perform a physical examination, and may recommend sleep studies to confirm OSA and assess severity.
- Imaging tests: X-rays or CT scans of your throat and airway may be used for further evaluation.
- Medications: Inform your doctor about any medications you take, especially blood thinners.
- Fasting: You may be instructed to fast for several hours before surgery.
The Surgical Journey:
- Anaesthesia: General anaesthesia is typically used to ensure comfort and safety during the procedure.
- Access: The surgeon uses special instruments to access the throat through the mouth.
- Tissue removal: Depending on the specific needs, the surgeon may remove:
- Part of the uvula: Usually the posterior portion to reduce its size and minimize its contribution to airway obstruction.
- Excess soft palate tissue: Trimming or reshaping the soft palate to widen the airway opening.
- Tonsils: If enlarged and contributing to the obstruction, they may be removed simultaneously.
- Closure: The incisions are typically closed with dissolvable stitches.
The Road to Recovery:
- Hospital stays: Depending on the complexity of the surgery, you may stay overnight or be discharged on the same day.
- Pain management: Medications will be provided to manage throat discomfort, which usually peaks within 2-3 days.
- Sore throat and difficulty swallowing: Expect discomfort for 1-2 weeks, gradually improving.
- Earache: Referred pain from healing may occur in the ears.
- Diet: Start with soft foods and clear liquids, gradually progressing as healing allows.
- Activity restrictions: Avoid strenuous activities for a few weeks to promote healing.
- Follow-up appointments: Regular check-ups are crucial to monitor healing, address any concerns, and assess the efficacy of the procedure.
The Rewards of Widening the Pathway:
- Improved sleep quality: Reduced sleep apnoea episodes and snoring, leading to deeper, more restful sleep.
- Reduced daytime sleepiness: Feeling more alert and energized throughout the day.
- Improved quality of life: Reduced fatigue, headaches, and mood changes associated with untreated OSA.
- Potential cardiovascular benefits: Improved sleep can positively impact blood pressure and reduce the risk of heart disease.
Potential Bumps on the Road:
- Bleeding: Minor bleeding after surgery is common but usually self-resolves.
- Infection: Though rare, proper hygiene and follow-up care minimize the risk.
- Dehydration: Difficulty swallowing may increase dehydration risk.
- Velopharyngeal insufficiency (VPI): In rare cases, a speech disorder resulting from a weakened palate may occur.
- Changes in voice quality: Temporary or permanent changes in voice tone or resonance are possible.
Remember:
- UPPP is a safe and effective procedure with high success rates when performed by a qualified surgeon.
- The decision to undergo surgery depends on the severity of your OSA, other treatment options, and potential risks vs. benefits.
- Open communication with your doctor is crucial throughout the process.
Disclaimer: This information is intended for general knowledge only and does not constitute medical advice. Please consult with your healthcare professional for diagnosis and treatment planning based on your specific situation.
DIRECT LARYNGOSCOPY
Unveiling the Mysteries of Direct Laryngoscopy: A Comprehensive Overview
Direct laryngoscopy, often shortened to DL, is a crucial diagnostic and therapeutic procedure used to visualize the larynx (voice box) and upper airway. This detailed summary delves into its purpose, preparation, steps, benefits, risks, and recovery to enhance your understanding.
Why See the Larynx Up Close?
Direct laryngoscopy plays a vital role in:
- Diagnosis: Examining the larynx and surrounding structures for abnormalities like inflammation, tumours, vocal cord problems, and airway blockages.
- Biopsies: Collecting tissue samples for further analysis to confirm diagnoses.
- Treatment: Removing foreign objects, performing laser surgery, and placing tubes for breathing assistance.
Preparing for the Examination:
- Medical history review: Your doctor discusses your medical history, allergies, and medications.
- Physical examination: This involves checking your throat and mouth for any obvious issues.
- Informed consent: You will be thoroughly informed about the procedure, its risks and benefits, and obtain your consent before proceeding.
- Fasting: You may be instructed to fast for several hours before the procedure.
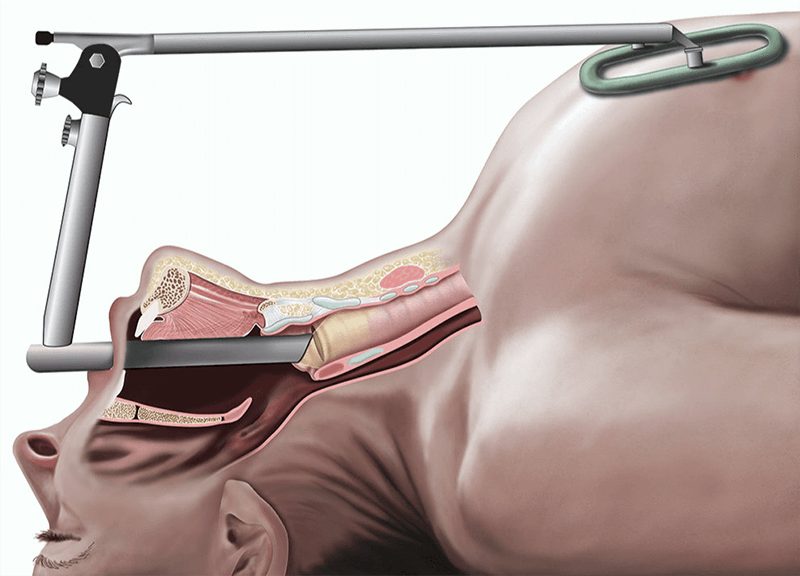
The Journey Through the Scope:
- Anaesthesia: Depending on the complexity and purpose, local anaesthesia with sedation or general anaesthesia may be used.
- Mouth opening: A mouthpiece or bite block is gently inserted to keep your mouth open comfortably.
- Laryngoscope insertion: The doctor uses a laryngoscope, a rigid or flexible tube with a light and camera, to visualize the larynx.
- Examination: The doctor carefully examines the larynx and surrounding structures, noting any abnormalities.
- Procedures (if applicable): Depending on the reason for the procedure, biopsies, foreign object removal, or laser surgery may be performed.
- Scope removal: The laryngoscope is gently removed.
The Path to Recovery:
- Recovery room monitoring: You will be monitored for your comfort and safety after the procedure.
- Sore throat: Expect a mild sore throat for a few days, managed with pain medication and throat lozenges.
- Hoarseness: Temporary hoarseness is common and usually resolves within a few days.
- Diet: Clear liquids are recommended initially, followed by a gradual progression to soft foods as tolerated.
- Depending on the reason for the procedure, follow-up appointments may be scheduled to monitor your progress and discuss results.
Benefits of Direct Vision:
- Accurate diagnosis: Provides a direct view of the larynx, allowing for precise diagnosis and evaluation of abnormalities.
- Treatment precision: Enables targeted interventions like biopsies, foreign object removal, and laser surgery with minimal tissue disruption.
- Fast results: Allows for immediate visual assessment and potential diagnosis during the procedure.
Potential Bumps on the Road:
- Bleeding: Minor bleeding, usually manageable, may occur.
- Infection: Though rare, proper hygiene and follow-up care minimize the risk.
- Tooth damage: Accidental contact with teeth during scope insertion is very rare but possible.
- Allergic reactions: Rarely, reactions to anaesthesia or medications may occur.
Remember:
- Direct laryngoscopy is a safe and effective procedure with high success rates when performed by a qualified healthcare professional.
- The decision to undergo DL depends on individual needs and potential benefits outweighing the risks.
- Open communication with your doctor regarding your concerns and expectations is crucial.
Disclaimer: This information is intended for general knowledge only and does not constitute medical advice. Please consult with your healthcare professional for diagnosis and treatment planning based on your specific situation.
MICROLARYNGOSCOPY
Microlaryngoscopy: A Magnified View for Laryngeal Diagnosis and Treatment
Microlaryngoscopy is a minimally invasive surgical procedure that allows a magnified examination and, in some cases, treatment of the larynx (voice box) and surrounding structures. It utilizes a microscope and specialized instruments for precise diagnosis and intervention.
Why Perform Microlaryngoscopy?
Microlaryngoscopy offers a valuable tool for diagnosing and treating various laryngeal conditions:
- Diagnosis:
- Vocal cord lesions (polyps, nodules, cysts, tumours)
- Vocal fold paralysis or weakness
- Laryngeal stenosis (narrowing of the airway)
- Chronic laryngitis
- Foreign objects lodged in the larynx
- Treatment:
- Removal of vocal cord lesions (biopsy or surgical excision)
- Correction of vocal fold paralysis or weakness (injections, implants)
- Dilation of a narrowed airway (laser surgery)
- Removal of foreign objects
Who is a Candidate for Microlaryngoscopy?
Microlaryngoscopy is suitable for individuals’ experiencing symptoms that suggest a laryngeal problem, such as:
- Hoarseness or voice changes
- Difficulty breathing
- Chronic cough
- Sensation of a lump in the throat
- Difficulty swallowing
The suitability for the procedure ultimately depends on the specific condition, overall health, and individual risk factors.
Types of Microlaryngoscopy:
There are two main approaches to microlaryngoscopy, differing in how the doctor visualizes the larynx:
- Indirect Microlaryngoscopy: This uses a small mirror placed at the back of the throat to reflect the image of the larynx into the microscope. It’s a less invasive approach but may not offer a detailed view of all areas.
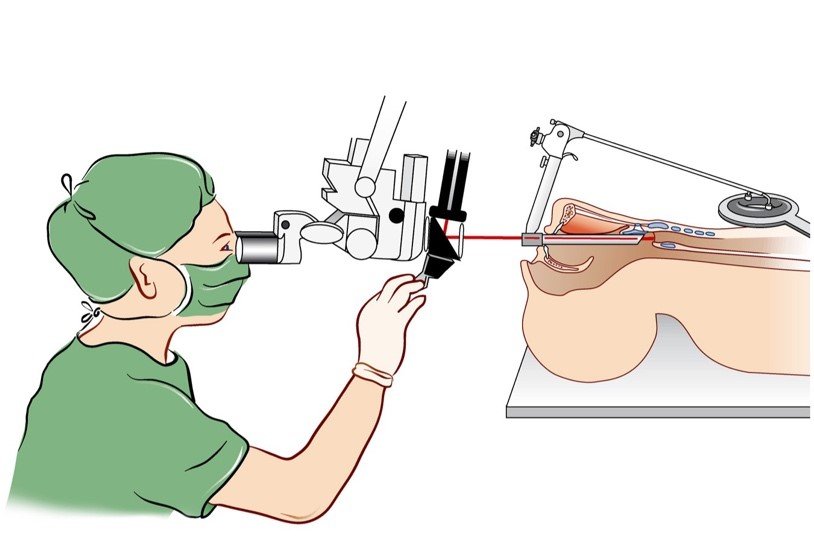
- Direct Microlaryngoscopy: This involves inserting a rigid scope (laryngoscope) through the mouth or nose to directly visualize the larynx under the microscope. It provides a magnified and detailed view, allowing for more precise diagnosis and treatment.
The Microlaryngoscopy Procedure (Typically Outpatient Surgery):
The specific details of the procedure depend on the chosen approach (indirect vs. direct) and the intended intervention. However, here’s a general breakdown:
Pre-Operative Assessment:
- Medical History and Physical Examination: The doctor will review your medical history, perform a physical examination focusing on the ears, nose, and throat, and discuss the procedure.
- Imaging Tests: X-rays or CT scans may be ordered in some cases to assess the larynx and surrounding structures.
- Anaesthesia: Depending on the complexity of the procedure, local anaesthesia with sedation or general anaesthesia may be used.
Surgical Steps (Direct Microlaryngoscopy Example):
- Anaesthesia Induction: Local anaesthesia with sedation or general anaesthesia is administered for patient comfort.
- Scope Insertion: The laryngoscope is carefully inserted through the mouth or nose, providing a direct view of the larynx.
- Microscopic Examination: The microscope is used to magnify the view of the larynx for detailed examination.
- Intervention (if needed): Depending on the diagnosis, the surgeon may use specialized instruments inserted through the laryngoscope to perform procedures like biopsy, lesion removal, or airway dilation.
- Scope Removal: Once the procedure is complete, the laryngoscope is carefully removed.
Recovery from Microlaryngoscopy:
Recovery from microlaryngoscopy is generally quick and involves:
- Hospital Stay: Microlaryngoscopy is often an outpatient procedure, allowing you to return home the same day.
- Sore Throat: You may experience a sore throat for a few days after the procedure.
- Voice Rest: Your doctor may recommend voice rest for a short period to allow for healing.
- Dietary Restrictions: Soft foods and cool liquids may be recommended for a day or two after surgery.
- Follow-up Appointment: A follow-up appointment with the doctor is scheduled to monitor healing and discuss any further treatment plans.
Benefits of Microlaryngoscopy:
Microlaryngoscopy offers several advantages:
- Minimally Invasive: Compared to traditional open surgery, microlaryngoscopy offers a less invasive approach, minimizing tissue disruption and accelerating recovery.
- Precise Diagnosis: Microscopic visualization allows for detailed examination, leading to a more accurate diagnosis of laryngeal conditions.
- Effective Treatment: Microlaryngoscopy can be used for both diagnostic and therapeutic purposes, allowing for simultaneous diagnosis and treatment in some cases.
- Faster Recovery: The minimally invasive nature of the procedure generally results in a faster recovery time compared to traditional surgery.
Important Considerations:
- While generally safe, microlaryngoscopy carries potential risks like bleeding, infection, and temporary vocal cord weakness.
Disclaimer: This information is intended for general knowledge only and does not constitute medical advice. Please consult with your healthcare professional for diagnosis and treatment planning based on your specific situation.
STAPPLING OF PHARYNGEAL POUCH
Pharyngeal Pouch Repair with Stapling: A Minimally Invasive Approach

Pharyngeal pouch surgery, also known as Zenker’s diverticulum repair, traditionally involves an incision in the neck (open transcervical approach) to remove the pouch and repair the oesophageal opening. While effective, this approach can lead to longer recovery times and more post-operative pain. In recent years, pharyngeal pouch repair with stapling has emerged as a minimally invasive alternative offering faster healing and reduced discomfort.
Who is a Candidate for Stapled Pharyngeal Pouch Repair?
Stapled pharyngeal pouch repair is not suitable for all cases. Here are some factors determining if it’s the right approach for you:
- Pouch Size: Generally, smaller pouches are better suited for stapling due to easier manoeuvrability of the stapler device.
- Pouch Location: Pouches located in a specific region of the oesophagus (proximal) are more amenable to stapling.
- Surgeon Expertise: This technique requires specialized training and experience with stapling devices for optimal outcomes.
Advantages of Stapled Pharyngeal Pouch Repair:
- Minimally Invasive: Small incisions in the abdomen and chest are used, leading to less tissue disruption and faster recovery.
- Reduced Pain: Smaller incisions translate to less post-operative pain compared to an open approach.
- Shorter Hospital Stay: Due to the minimally invasive nature, you might be able to go home sooner compared to traditional open surgery.
- Faster Return to Normal Activities: Reduced pain and quicker healing allow for a faster return to your daily routine.
Pre-Operative Assessment:
- Medical History and Physical Examination: The doctor will review your medical history, perform a physical examination focusing on the throat and swallowing function, and discuss the procedure.
- Imaging Tests: Barium X-ray or endoscopy may be used to confirm the diagnosis and assess the size and location of the pouch.
- Anaesthesia:General anaesthesia is typically used to ensure patient comfort during the procedure.
The Procedure:
Stapled pharyngeal pouch repair is typically performed under general anaesthesia. Here’s a breakdown of the steps:
- Anaesthesia: General anaesthesia is administered through an IV line, allowing you to sleep comfortably throughout the procedure.
- Positioning: You’ll be positioned lying on your back with your abdomen slightly inflated with carbon dioxide to create better visibility for the surgeon.
- Incisions: The surgeon makes a few small incisions in the abdomen and chest to access the surgical field.
- Laparoscopic Access: Laparoscopic instruments, including a camera and surgical tools, are inserted through the incisions.
- Pouch Identification: The surgeon uses the laparoscope to visualize the pharyngeal pouch and surrounding structures.
- Stapler Introduction: A specialized surgical stapler is introduced through one of the incisions.
- Pouch Stapling: The surgeon carefully positions the stapler across the base of the pouch and fires the stapler, effectively dividing the pouch from the oesophagus. This stapling manoeuvre also reinforces the closure of the oesophageal opening.
- Diverticulectomy (Optional): In some cases, the stapled pouch may be removed entirely through the laparoscopic incisions (diverticulectomy).
- Leak Test: The surgeon performs a leak test to ensure the oesophageal closure is secure.
- Instrument Removal and Incision Closure: Laparoscopic instruments are removed, and the small incisions are closed with sutures or surgical staples.
Recovery:
- Hospital Stay: The typical hospital stay for stapled pharyngeal pouch repair is shorter compared to the open approach, often ranging from 1-2 days.
- Diet: Initially, you may be started on clear liquids, gradually progressing to a soft diet as tolerated. You will be advised on dietary modifications to promote healing and prevent future pouch formation.
- Pain Management: You may experience some discomfort after surgery, which can be managed with medication. Pain is generally less severe compared to open surgery due to the smaller incisions.
- Follow-Up: Regular follow-up appointments with your doctor are crucial to monitor your recovery and ensure proper healing.
Long-Term Considerations:
- Recurrence: While stapled pharyngeal pouch repair has good success rates, there’s a small possibility of pouch recurrence. Regular follow-up helps in early detection.
- Dietary Modifications: Following a healthy diet with proper swallowing techniques can help prevent future pouch formation.
Important Considerations:
- While generally safe, stapling of a pharyngeal pouch carries potential risks like bleeding, infection, and oesophageal perforation (a hole in the oesophagus).
- There is a small possibility that the pouch may recur in some patients over time.
- This procedure may not be suitable for all cases, particularly for very large pouches or those with complex anatomy.
Overall, stapled pharyngeal pouch repair offers a promising minimally invasive approach for select patients with Zenker’s diverticulum. If you’re a candidate for this technique, discussing it with your doctor can help you decide if it’s the right option for you.
Disclaimer: This information is intended for general knowledge only and does not constitute medical advice. Please consult with your healthcare professional for diagnosis and treatment planning based on your specific situation.
