
FLEXIBLE NASENDOSCOPY
Demystifying the Scope: A Detailed Look at Flexible Nasendoscopy

Flexible nasendoscopy, also known as fiberoptic nasendoscopy or flexible laryngoscopy, is a minimally invasive diagnostic procedure used to examine the inside of the nose, nasopharynx (upper part of the throat behind the nose), voice box (larynx), and sometimes even the upper part of the esophagus. This detailed summary delves into the procedure’s purpose, preparation, steps, risks, and recovery to provide a comprehensive understanding.
Purpose:
Flexible nasendoscopy helps diagnose various conditions affecting the above-mentioned areas, including:
- Allergies and chronic sinusitis
- Nasal polyps or tumours
- Vocal cord problems (hoarseness, nodules)
- Difficulty swallowing
- Bleeding from the nose or throat
- Foreign objects lodged in the nose or throat
- Suspected cancer in the head and neck region
Preparation:
- You may be asked to avoid eating or drinking anything for a few hours before the procedure.
- Inform your doctor of any medications you’re taking, especially blood thinners.
- Discuss any allergies you have, including anesthesia.
Procedure Steps:
- Numbing: A topical anesthetic spray or gel may be applied to numb the inside of your nose.
- Scope insertion: A thin, flexible tube with a camera and light source is gently inserted through your nostril and carefully guided through the nasal passages into the nasopharynx, larynx, and potentially the esophagus.
- Examination: The doctor visualizes the internal structures on a monitor, checking for abnormalities, inflammation, or other issues.
- Biopsy (if needed): Tiny tissue samples may be collected for further analysis if necessary.
- Removal (if needed): In some cases, foreign objects or small polyps can be removed through the scope.
- Scope removal: The scope is gently withdrawn.
Risks and Complications:
Flexible nasendoscopy is generally a safe procedure, but potential risks include:
- Minor nosebleeds
- Temporary discomfort or sore throat
- Sinus pain
- Allergic reaction to numbing medication
Recovery:
- You may experience mild discomfort or a scratchy throat after the procedure, which usually subsides within a few hours.
- Avoid blowing your nose forcefully for a few days.
- You can resume normal activities soon after, unless otherwise advised by your doctor.
Additional Information:
- The procedure typically takes 10-15 minutes, but may vary depending on the complexity.
- You may not feel any pain but experience discomfort or gagging reflex during the scope insertion.
- Anesthesia is rarely used for this procedure.
- Discuss any concerns or questions you have with your doctor beforehand.
Disclaimer: This information is intended for general knowledge only and does not constitute medical advice. Please consult with your healthcare professional for diagnosis and treatment planning based on your specific situation.
MICROSUCTION EARS / AURAL TOILET
Micro-suction Earwax Removal: A Deep Dive into the Procedure
Micro-suction is a safe and effective method for removing stubborn or impacted earwax, providing relief from various ear-related complaints. This detailed summary delves into the procedure’s purpose, preparation, steps, benefits, risks, and recovery to fully equip you with the knowledge you need.
Purpose:
Earwax naturally cleans and protects the ear canal, but sometimes it builds up excessively, leading to:
- Hearing loss: Muffled sounds or partial deafness due to the wax blockage.
- Tinnitus: Ringing or buzzing sounds in the ear.
- Dizziness: Caused by the inner ear being affected by the wax buildup.
- Earache: Discomfort or pain due to pressure or irritation from the wax.
- Fullness in the ear: A sensation of blockage within the ear canal.
- Coughing: Triggered by wax dislodging and trickling down the throat.
Microsuction is a preferred method for removing excessive or impacted earwax, especially when:
- Ear irrigation (syringing) is contraindicated: Not recommended for individuals with perforated eardrums, recent ear surgery, or certain medical conditions.
- Other methods are ineffective: Wax softeners or curettes haven’t successfully removed the blockage.
- Precise removal is needed: In cases of foreign objects lodged in the ear canal.
Preparation:
- No specific preparation is typically required.
- Inform your doctor of any:
- Previous ear infections or surgeries.
- Eardrum perforations.
- Allergies, especially to local anesthetics.
- Medications you’re taking, particularly blood thinners.
Procedure Steps:
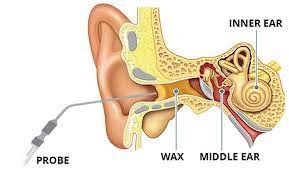
- Examination: The doctor uses an otoscope to examine your ear canal and assess the wax type and location.
- Microscope positioning: A binocular operating microscope provides magnified visualization of the ear canal for precise manipulation.
- Suction device placement: A thin, low-pressure suction tube is gently inserted into the ear canal.
- Wax removal: Under clear visualization, the doctor carefully and meticulously removes the earwax using the suction device.
- Inspection: The doctor re-examines the ear canal to ensure complete wax removal and assess the eardrum’s health.
Benefits:
- Safe and effective: Suitable for most types of earwax, even for individuals with sensitive ears.
- Precise removal: Minimizes the risk of damage to the ear canal compared to other methods.
- Minimal discomfort: Generally a painless procedure, with local anesthesia optional in some cases.
- No water used: Eliminates the potential complications associated with water entering the ear, making it safe for those with eardrum perforations or recent ear surgery.
- Quick procedure: Typically lasting only 10-15 minutes.
Risks and Complications:
- Microsuction is generally safe with minimal risks, including:
- Minor discomfort or bleeding: Temporary and usually mild.
- Temporary dizziness or tinnitus: Transient and uncommon.
- Infection (rare): Proper sterilization techniques minimize this risk.
Recovery:
- No special recovery care is needed.
- Avoid inserting anything, including cotton swabs, into your ear for 24-48 hours to allow the ear canal to heal.
- You can resume normal activities immediately.
Additional Information:
- Discuss any concerns or questions you have with your doctor beforehand.
- Microsuction is becoming increasingly popular due to its safety and effectiveness compared to other methods.
- Always seek professional help for earwax removal, especially if you have underlying medical conditions or experience persistent symptoms.
Disclaimer: This information is intended for general knowledge only and does not constitute medical advice. Please consult with your healthcare professional for diagnosis and treatment planning based on your specific situation.
Fine Needle Aspiration cytology (FNAc)
Fine Needle Aspiration: A Closer Look

Fine needle aspiration (FNA) is a minimally invasive procedure used to collect a sample of cells from suspicious lumps, bumps, or areas of abnormal fluid accumulation in the body. This summary dives into the procedure’s purpose, preparation, steps, benefits, risks, and recovery to provide a comprehensive understanding.
Purpose:
FNA helps diagnose various conditions, including:
- Cancer: Breast cancer, thyroid nodules, lymph node enlargements, lung masses, and more.
- Infections: Abscesses, swollen lymph nodes due to infection, and suspected fluid collections with unknown cause.
- Non-cancerous conditions: Benign cysts, lipomas, and other abnormal tissue growths.
Preparation:
- You may be asked to avoid certain medications like blood thinners before the procedure.
- Inform your doctor of any allergies, especially to local anesthesia.
- Discuss any recent illnesses or medical conditions.
- Wear loose clothing for easier access to the procedure site.
Procedure Steps:
- Numbing: Sometimes a local anesthetic numbs the area to minimize discomfort.
- Needle insertion: A thin, hollow needle is carefully inserted into the suspicious area under ultrasound or other imaging guidance.
- Aspiration: Cells are withdrawn through the needle using gentle suction from a syringe.
- Smear preparation: The collected cells are spread onto a glass slide for microscopic examination.
- Optional biopsy: In some cases, a small tissue sample may also be collected alongside the aspirated cells.
- Needle removal: The needle is gently withdrawn, and pressure is applied to the site to minimize bleeding.
Benefits:
- Minimally invasive: Minimizes discomfort and risk compared to surgical biopsies.
- Quick and safe: Typically takes 15-30 minutes and has minimal risks.
- Cost-effective: Less expensive than surgical biopsies.
- Diagnostic accuracy: Can often provide conclusive diagnosis, eliminating the need for further procedures.
Risks and Complications:
- Pain or discomfort: Usually minimal and well-managed with local anesthesia.
- Bleeding: Minor bleeding at the puncture site is common but self-resolves quickly.
- Infection (rare): Proper sterile techniques minimize this risk.
- Inconclusive results: In some cases, the aspirate may not contain enough cells for a definitive diagnosis, requiring further tests.
Recovery:
- You may experience mild soreness or bruising at the biopsy site for a few days.
- Apply ice packs to reduce swelling and discomfort.
- Avoid strenuous activities for 24-48 hours.
- Follow your doctor’s instructions for wound care and follow-up appointments.
Additional Information:
- The FNA procedure itself is often painless, but the numbing injection may cause a stinging sensation.
- The results of the FNA may take a few days to a week to come back.
- Depending on the results, further tests or treatments may be recommended.
Disclaimer: This information is intended for general knowledge only and does not constitute medical advice. Please consult with your healthcare professional for diagnosis and treatment planning based on your specific situation.
EPLEY’S MANOEUVRES
Epley Manoeuvre: Dethroning Dizziness with Precision Movements

The Epley manoeuvre, a series of precisely coordinated head positions, effectively treats a specific type of vertigo called benign paroxysmal positional vertigo (BPPV). This detailed summary delves into the procedure’s purpose, mechanics, steps, benefits, risks, and recovery to equip you with comprehensive knowledge.
Understanding the Culprit:
BPPV arises from tiny calcium carbonate crystals (canaliths) dislodging from their usual location in the inner ear and migrating into the semicircular canals. These canals are responsible for balance, and the misplaced canaliths send confusing signals to the brain, causing vertigo episodes triggered by specific head movements.
The Therapeutic Dance:
The Epley manoeuvre aims to reposition the canaliths back into their rightful place within the utricle, eliminating the source of vertigo. The specific sequence of head positions depends on the affected inner ear, determined by your healthcare professional through diagnostic tests.
A Step-by-Step Guide:
Preparation:
- Sit upright on a firm surface with a clear space around you.
- Have a pillow ready for head positioning.
Maneuver Steps (assuming right ear BPPV):
- Turn: Turn your head 45 degrees to the left, keeping your gaze straight ahead.
- Lie down: Quickly lie down on your back, maintaining the head position (leftward gaze). You may feel brief vertigo.
- Head turn: Without lifting your head, turn it further 90 degrees to the right (head now facing down) so you’re looking at the floor 45 degrees to your right. Stay in this position for 30 seconds.
- Roll: While keeping your head and neck aligned, slowly roll your entire body a full 90 degrees to the right, ending up lying on your right side with your head still facing down. Stay in this position for 30 seconds.
- Sit up: Slowly return to a sitting position while keeping your head turned down 45 degrees to the right for another 30 seconds.
- Final turn: Gently turn your head back to the center position to face forward.
Repeat the entire sequence two more times for optimal results.
Benefits:
- High success rate: Effectively resolves BPPV symptoms in most cases.
- Minimally invasive: No medication or surgery involved.
- Safe and quick: Can be performed at home after proper instruction.
- Long-lasting relief: Helps prevent future BPPV episodes.
Risks and Complications:
- Temporary dizziness: Brief vertigo during the maneuver is common and harmless.
- Neck strain: If performed incorrectly, may cause minor neck discomfort.
- Ineffectiveness: Not suitable for all types of vertigo or in severe cases.
Recovery:
- Avoid driving or operating machinery for several hours after the maneuver due to potential residual dizziness.
- Resume normal activities gradually, avoiding head movements that trigger vertigo.
- Consult your healthcare professional if symptoms persist or recur.
Additional Information:
- The Epley manoeuvre should be performed under the guidance of a healthcare professional to ensure proper technique and safety.
- Variations of the manoeuvre exist for BPPV affecting the left ear or different canal involvement.
- Lifestyle modifications like avoiding head banging or sleeping on the affected side can help prevent BPPV recurrence.
Disclaimer: This information is intended for general knowledge only and does not constitute medical advice. Please consult with your healthcare professional for diagnosis and treatment planning based on your specific situation.
PURE TONE AUDIOGRAM (PTA)
Unveiling Your Hearing: A High-Detail Look at Pure Tone Audiometry

Pure tone audiometry, often shortened to PTA, is a crucial tool used to assess your hearing sensitivity across different frequencies. This detailed summary delves into its purpose, preparation, steps, benefits, and potential implications to empower you with comprehensive knowledge.
Why Hear the Spectrum?
- Identifying hearing loss: Detects and measures the degree of hearing loss, helping diagnose its type and severity.
- Monitoring changes: Tracks changes in hearing over time, aiding in treatment evaluation and early detection of further loss.
- Fitting hearing aids: Provides valuable information for selecting and adjusting hearing aids for optimal benefit.
Preparing for the Test:
- Minimal preparation: No special preparations are typically required unless wearing earwax buildup that needs removal.
- Inform your doctor: Mention any ear infections, recent head injuries, or current medications that might affect your hearing.
The Audiometric Journey:
- Soundproof booth: You’ll enter a quiet, soundproof booth to minimize external noise interference.
- Headphones or earphones: These are placed over or in your ears to deliver the sound stimuli.
- Pure tones: A series of pure tones at various frequencies (pitched from low to high) are presented individually through each ear, one at a time.
- Your response: You indicate when you hear a tone by raising your hand or pressing a button.
- Intensity adjustments: The intensity of each tone is carefully adjusted until you just barely perceive it (your hearing threshold).
The Audiogram Revealed:
- Results visualized: Your responses are plotted on a graph called an audiogram, displaying hearing thresholds at different frequencies for each ear.
- Interpretation: Audiologists analyze the audiogram to assess hearing loss type, degree, and potential causes.
Benefits of Knowing Your Hearing:
- Early diagnosis: Timely diagnosis enables prompt intervention and management of hearing loss, potentially slowing its progression or maximizing treatment effectiveness.
- Improved communication: Understanding your hearing profile helps choose optimal communication strategies and utilize assistive devices if needed.
- Enhanced quality of life: Addressing hearing loss can significantly improve your ability to engage in social activities, enjoy entertainment, and participate fully in everyday life.
Potential Implications:
- Types of hearing loss: Depending on the audiogram patterns, different types of hearing loss like conductive, sensorineural, or mixed loss can be identified.
- Severity levels: Mild, moderate, severe, or profound hearing loss can be determined, guiding treatment recommendations.
- Further investigations: In some cases, additional tests might be needed to pinpoint the specific cause of hearing loss.
Remember:
- Pure tone audiometry is a safe, painless, and reliable test.
- The test results guide appropriate management strategies and interventions for your individual hearing needs.
- Consult your audiologist or doctor for proper interpretation of your audiogram and a personalized approach to optimize your hearing experience.
Disclaimer: This information is intended for general knowledge only and does not constitute medical advice. Please consult with your healthcare professional for diagnosis and treatment planning based on your specific situation.
TYMPANOMETRY
Unveiling the Mysteries of Tympanometry: A Deep Dive

Tympanometry, also known as impedance audiometry, is a valuable tool used to assess the middle ear function by measuring its pressure and mobility. This detailed summary delves into its purpose, preparation, steps, benefits, potential implications, and recovery to empower you with comprehensive knowledge.
Understanding the Why:
- Middle ear health: Tympanometry evaluates the middle ear’s ability to transmit sound vibrations, aiding in diagnosing various conditions like:
- Otitis media with effusion (fluid in the middle ear)
- Perforated eardrum
- Eardrum retraction
- Otosclerosis (bone hardening in the middle ear)
- Eustachian tube dysfunction
- Hearing loss evaluation: It helps differentiate conductive hearing loss (due to middle ear issues) from sensorineural hearing loss (inner ear or nerve problems).
- Monitoring treatment: Tracks changes in middle ear function over time, monitoring treatment effectiveness for conditions like otitis media with effusion.
Preparing for the Probe:
- Minimal preparation: No special preparations are typically required.
- Calm environment: A quiet and relaxed environment ensures accurate results.
- Inform your doctor: Mention any ear infections, recent head injuries, or current medications, especially ear drops, that might affect the test.
Exploring the Middle Ear:
- Probe placement: A gentle probe with a soft tip is placed in your ear canal to seal it airtight.
- Air pressure changes: The probe rapidly changes air pressure within the ear canal.
- Eardrum response: The probe measures how the eardrum and middle ear bones vibrate in response to the pressure changes.
- Tympanogram: The results are displayed on a graph called a tympanogram, showing the middle ear’s compliance (ease of movement) at different pressures.
The Tympanogram Unveils the Story:
- Normal results: Show a characteristic peak representing healthy middle ear function.
- Abnormal results: Indicate potential issues like fluid, ossicular chain problems, or eardrum abnormalities based on the specific pattern on the tympanogram.
- Additional tests: Depending on the results, further tests like audiometry or otoscopy might be recommended for a more comprehensive evaluation.
Benefits of Delving Deeper:
- Accurate diagnosis: Helps pinpoint the exact cause of middle ear problems, leading to appropriate treatment.
- Early detection: Can identify issues like otitis media with effusion early, preventing potential complications.
- Monitoring progress: Tracks treatment effectiveness and allows for adjustments if needed.
- Painless and quick: The procedure is painless and typically takes only a few minutes.
Potential Implications:
- Interpretation: The tympanogram results need to be interpreted by a qualified healthcare professional in conjunction with other findings and your medical history.
- Additional investigations: Depending on the results, further testing might be necessary for a definitive diagnosis.
- Treatment options: Based on the underlying cause, different treatment options such as antibiotics, decongestants, or surgery might be considered.
Remember:
- Tympanometry is a safe and valuable diagnostic tool for assessing middle ear function.
- The test results alone may not provide a definitive diagnosis, and further evaluation by a healthcare professional is crucial.
- Open communication with your doctor about your concerns and the test results is essential for receiving proper diagnosis and treatment.
Disclaimer: This information is intended for general knowledge only and does not constitute medical advice. Please consult with your healthcare professional for diagnosis and treatment planning based on your specific situation.
